Wednesday, June 18, 2014

Ombre with Flare


Have I posted a lot in June or what?!?! Perks of being unemployed I guess :/ 


Today's mani is inspired by Sarah Smyle, I found her on Instagram so give her a looksie. 


I like this mani because the colors are very summery.


It was also fairly easy to do. The base coat is the coral I am holding, then I dabbed on the darked coral to the ends and worked my way up the nail only going halfway. 
when that dried I did slightly overlapping dots of yellow, green, and blue. Then with a black striping brush I made the lines coming out from the dots! 

\
The orignal design is SOOOO much better than mine, but I am still pleased with how it turned out. 


Enjoy the design, your day, and your LIFE. 
As always: 
FOLLOW ME ON SOCIAL MEDIA
@sharpdressednails on Instagram
Nail Art board on Pintrest
Thanks byeee. 


Monday, June 16, 2014

FIFA World Cup Nails-- GO USA


GOOOOAAAAALLLLLLLL!!! 
That's a soccer term right? 

If you are a sports enthusiast, you probably know about the FIFA World Cup currently going on. Soccer has never really been my sport. It's really boring to watch, and I don't really understand the rules. 


But luckily for me I married a former soccer player, which means we are watching the world cup, especially tonight when USA plays Ghana. Apparently we aren't that great, and we are in group G... which I've learned is really really bad, and we aren't likely to win. 


Despite all this, I took the opportunity to support USA sports and get my nails ready for the game. 


I did our country's flag, USA, a soccer ball, red, white, & blue glitter, and the turf/grass the game is played on. 


Big events like this are always really exciting, mostly because for once our country can ban together and cheer for the SAME thing. Weird concept these days when we try so hard to separate ourselves into many different sects. It's nice to be United, even if it's only for one game in a world cup that comes around every 4 years. I digress... 


Enjoy the game if you watch it tonight, and hopefully you will understand what is going on... unlike me... 


Hope you enjoyed!
As always follow me on Instagram, Pintrest, or this blog!!! 
Check out my other nail art creations!!
USA.USA.USA.


Tuesday, June 10, 2014

Tiffany & Co. Bachelorette Party


I love party planning, sadly I rarely get the opportunity... but when I do I go a little crazy. This party was thrown for my best friend who is getting married June 28th! She is a classy girl, and I wanted a classy (and fun) party. As far as Bachelorette parties go we party on the tame side... no guys, no booze, no anatomy shaped cakes... just a nice affair. We had all the guests dress in their black dresses with pearls to really set the mood, hilarious games, and a photo booth rounded out the evening... oh and lots of fun gifts for the bride-to-be!


I used the cupcake stand from my wedding to display lingerie cupcakes and mini fruit pizzas (which by the way were delicious!!!). 


The menu was mostly small tapas. The menu consisted of: 
Pigs-in-a-blanket
Copycat Cheddar's spinach dip with blue corn tortilla chips
Cream cheese spread and bagel chips
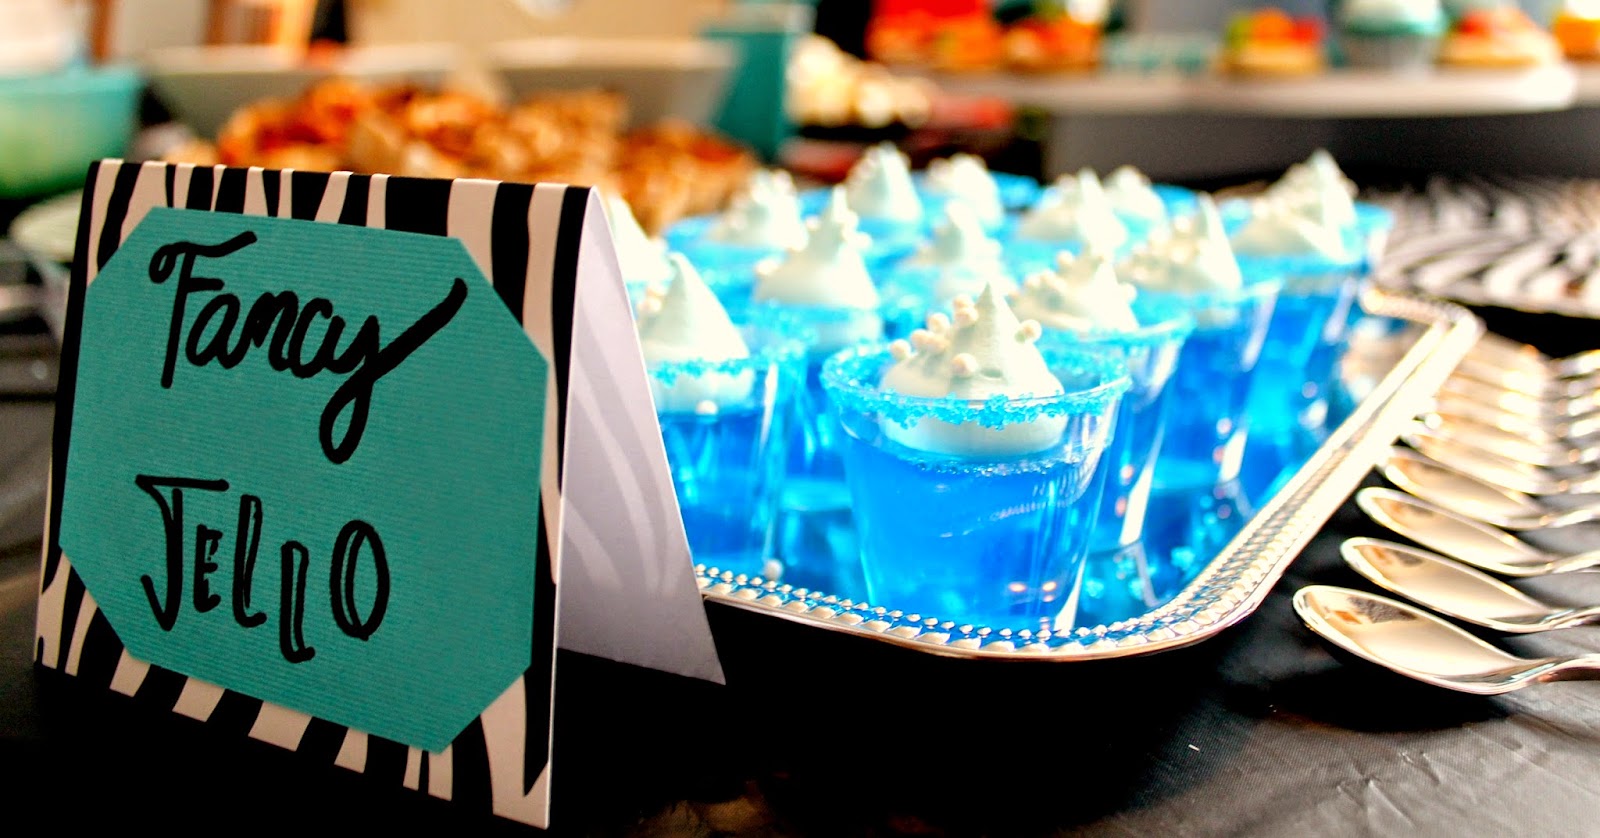
"Fancy" jello
Lingerie cupcakes (see picture instructions below)


Everything was delish if I do say so myself. Especially good since it was transferred from Huntsville, AL to Cookeville, TN. Not an easy task. 


Decorations were the Bride & co. banner seen above, as well as bra and panty garland made out of scrap book paper! SOOO CUTE!!! My friend's future sis-in-law made most of the decor and it turned out so cute.
The panty wreath welcomed the bride to the party! Very cute and very easy to make. We did a small wreath and attached 12 pairs of panties to it. We could have gotten away with less, but I had already bought several things before I started assembly. The instructions just tied the panties to the wreath with ribbon, but for a cleaner look I used sowing pins to attach the panties and used the ribbon as decoration.
Panty wreath
 FAVORS 
Sugar scrub favors
I made a sugar scrub for the guests to take home. Something classy and different than anything I've ever taken home after a party ;) 

Hope you enjoyed what you see! For questions on how to pull off your own Tiffany inspired party, ask an expert... or message me ;) 
If you enjoy nails see my other posts, or follow me on InstagramPintrest

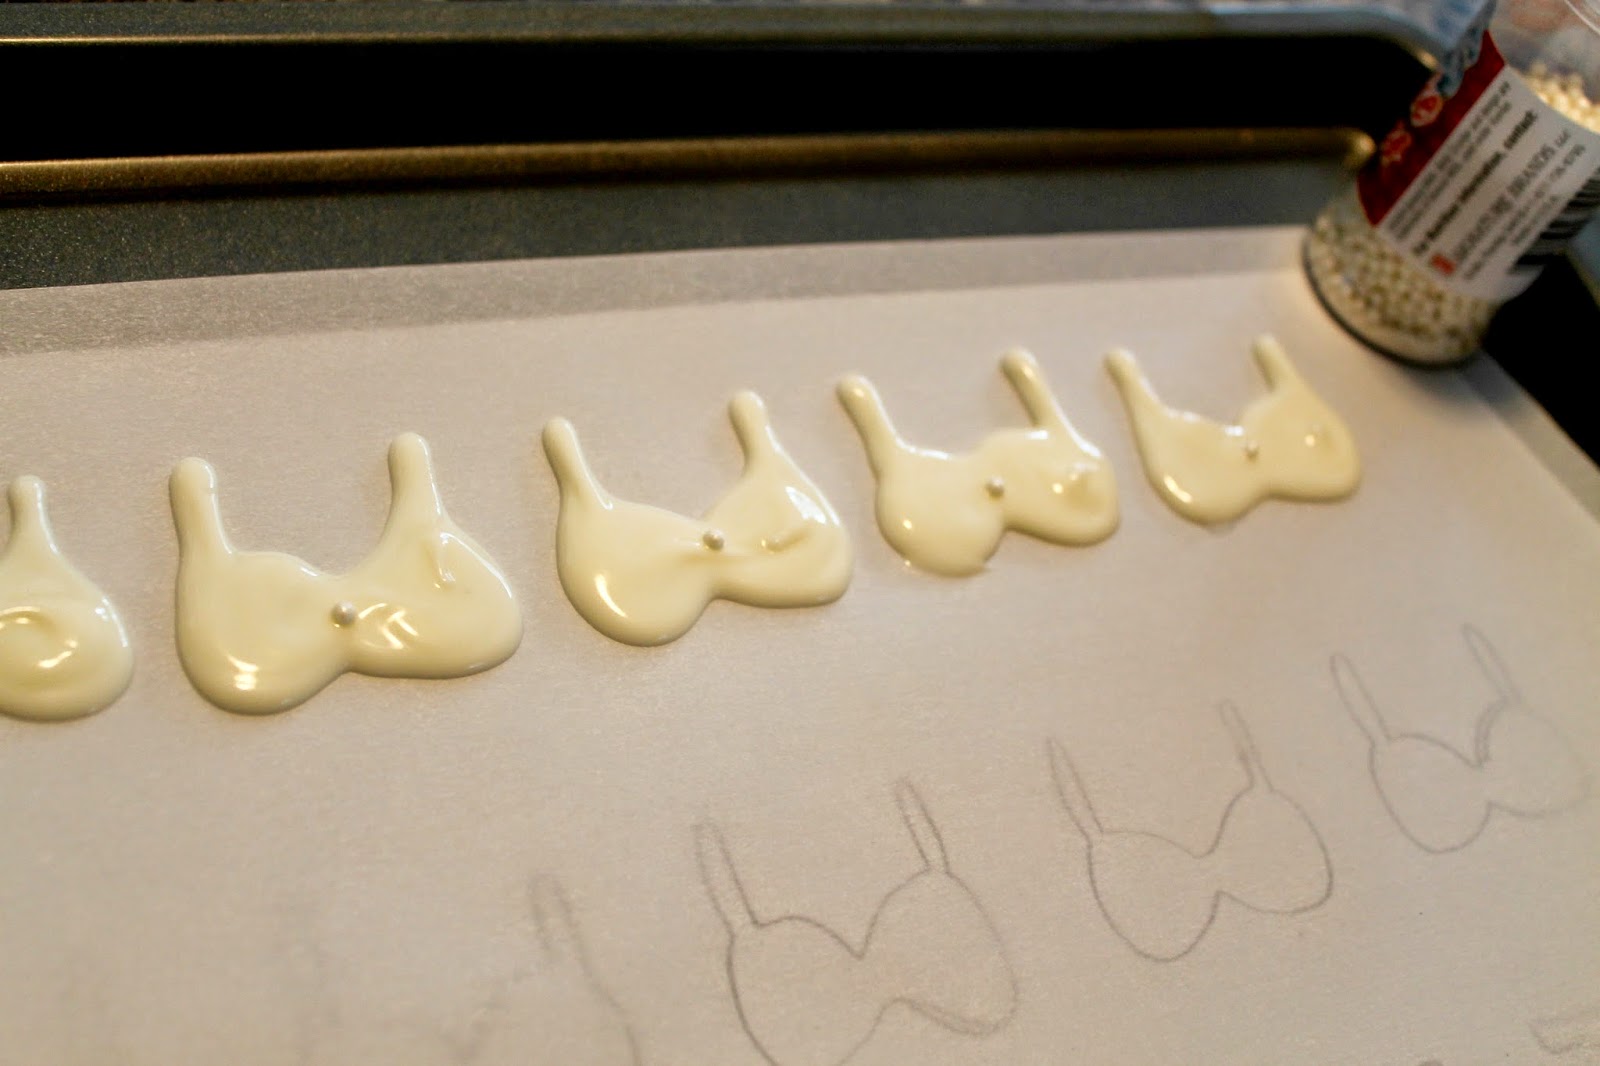
HOW TO MAKE lingerie cupcake toppers
You will need: 
White melting chocolate bark (I used almond bark)
Edible pearls
Parchment paper
Set up double boiler 
Storing container

First: Melt candy coating over double boiler... yes you can microwave but I don't always have success with white chocolate and the microwave. More often than not I end up with a lot of over-hard chocolate... no bueno for this project. 


Add the melted chocolate to a plastic baggie. LET COOL. Trust me this stuff is LAVA hot, and it is close to impossible to pipe when it's that hot. So while that is cooling...

Cut two pieces of parchment to fit a cookie sheet, on the first sketch out your design (in this case bras and panties), I made one of each on smaller parchment pieces and just traced.


Layer the parchment. Designed piece goes down first, then the plain piece.


Pipe. If the baggie is cool enough to handle and still melted, snip the end of the bag. You can now begin piping the designs. Try to have one fluid motion, in my case many of the bras looked a little "nipply," so I tried to smooth them out... but hey it is a Lingerie shower. 


A little pointy but still okay. 


Transfer your finished piped designs to the fridge or freezer, let cool till hard. This really only takes a few minutes.
While that is going Prepare your holding container, snip a few small pieces of parchment to fit the container. 


TAH-DAH


I dropped a few too many pearls on one.


Add to holding container until you are ready to top your cupcakes!! 

ENJOY!!! 


Tiffany & Co. Inspired Nails

This week was my best friends BACHELORETTE party!! The theme was Tiffany & Co., mostly because I loved how classy it was and the color combo. I thought it would be perfect for the soon-to-be bride.
Tiffany & Co. Nails
 I'm adding a NON-NAIL post to show some of the party pics and ideas we put together. 


But back to the nails, the China Glaze color is actually called For Audrey, so it's the exact teal color I needed. The accent nail is inspired by a black dress and pearls, so classy and SO Audrey Hepburn. The thumb is the classic bow from those little blue boxes! 


*Left hand.* Ugh these nails are too nubby!! 


Follow me on Instagram & Pintrest for more fun! 
Check out my Tiffany & Co. inspired Bachelorette party here!! 


Wednesday, June 4, 2014

Spring Florals & Wedding Update!

This is the Tale of Two Florals
Peachy Floral
Nude Floral
If it feels like it's been forever since I have blogged any nail art... that's probably because it HAS been forever. 


First off... I'M MARRIED!! April 26, 2014 is a day I will always remember. We had beautiful skies, a lovely venue (Clark House), many guests, and oh- cupcakes, lots of them! 
  

Those puppies were tasty. Although I didn't get to try one until a month after the wedding-- But I digress. 


These nails are perfect for spring time. Which seems to be coming to a close. . . the suppressing heat of an Alabama summer is almost upon me, I look back fondly on pretty sunny days with a high of 75


Both of these florals are wonderful in different ways. When I am at a loss for what kind of nail art to create, my "go-to" always seems to be florals... or cheetah print. But really, if that's my go-to I'm  bond to never fail. 


It's sad to say, but lately my nails have been little nubbies. The poor things went through gels nails for the wedding, which as beautiful as they are racked my nails. Sadly, I am probably to blame. When the natural nail started growing out, I peeled off the polish... shhhhh don't tell anyone of this shameful action. 


Peace out!! Check out my other stuff and follow me on Instagram and Pintrest!!